

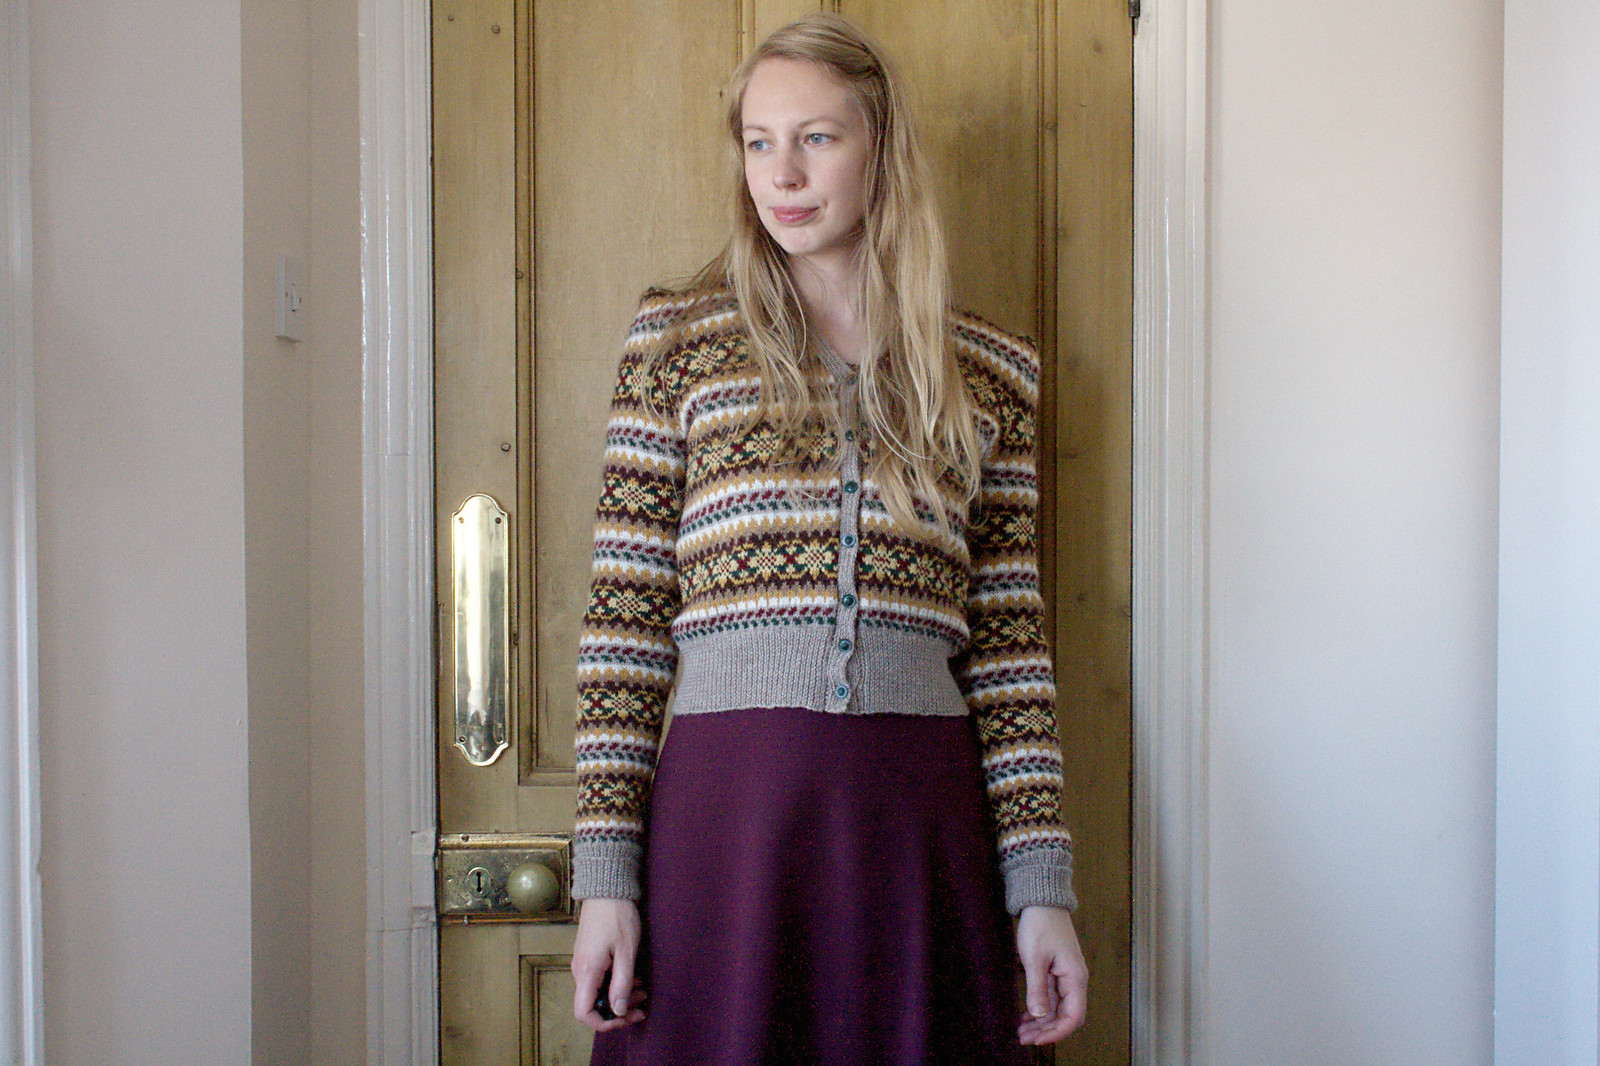
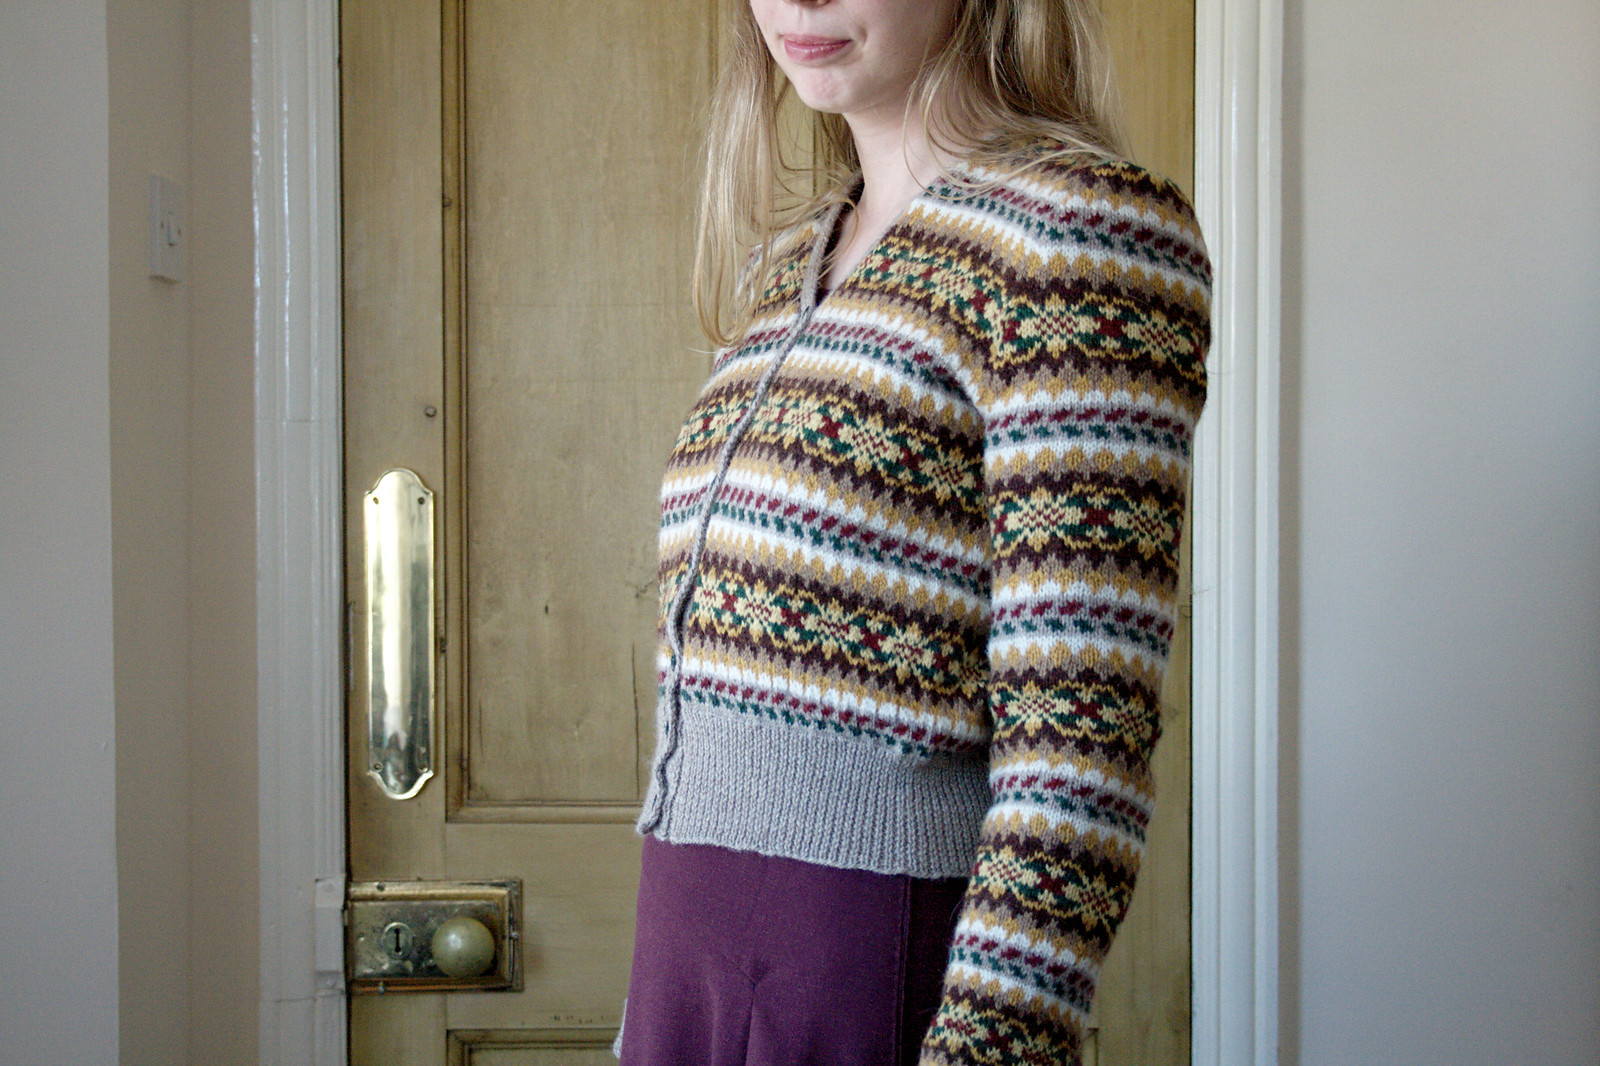
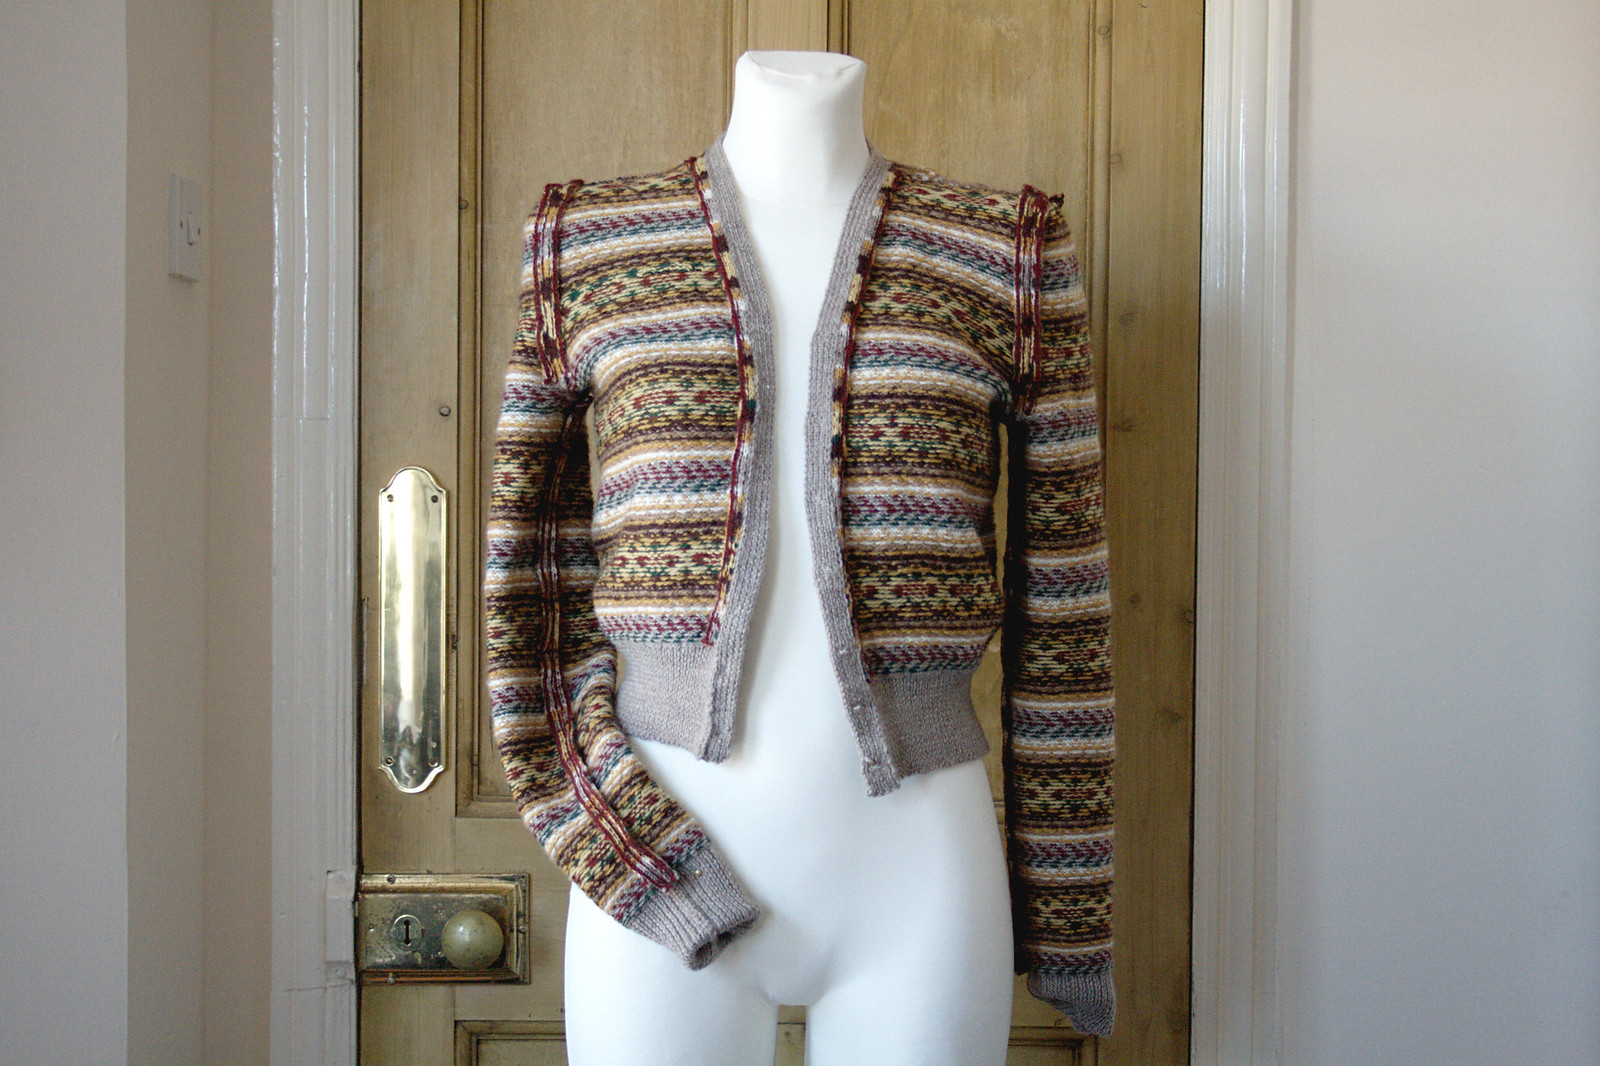
Finished: 1950's Fair Isle Cardigan!
I'm so excited to finally share pictures of my 1950's fair isle cardigan with you! Ever since I finished it a few weeks ago I have been so eager to share it with you, but I simply didn't get round to taking photo's - until now! Just a slight warning: this is going to be a long post!
Preparations
After knitting the Swedish 1940's cardigan with steeks, I gained a lot of confidence as well as a new obsession. Even though summer was coming and I had planned to make some summer knits, all I could think of was colorwork. Finally I decided to give in, but now came the hard part: what to knit?! I realized that I really wanted to go all the way: proper fair isle. So I settled for a lovely 1950's Fair Isle cardigan: Bestway B2637.

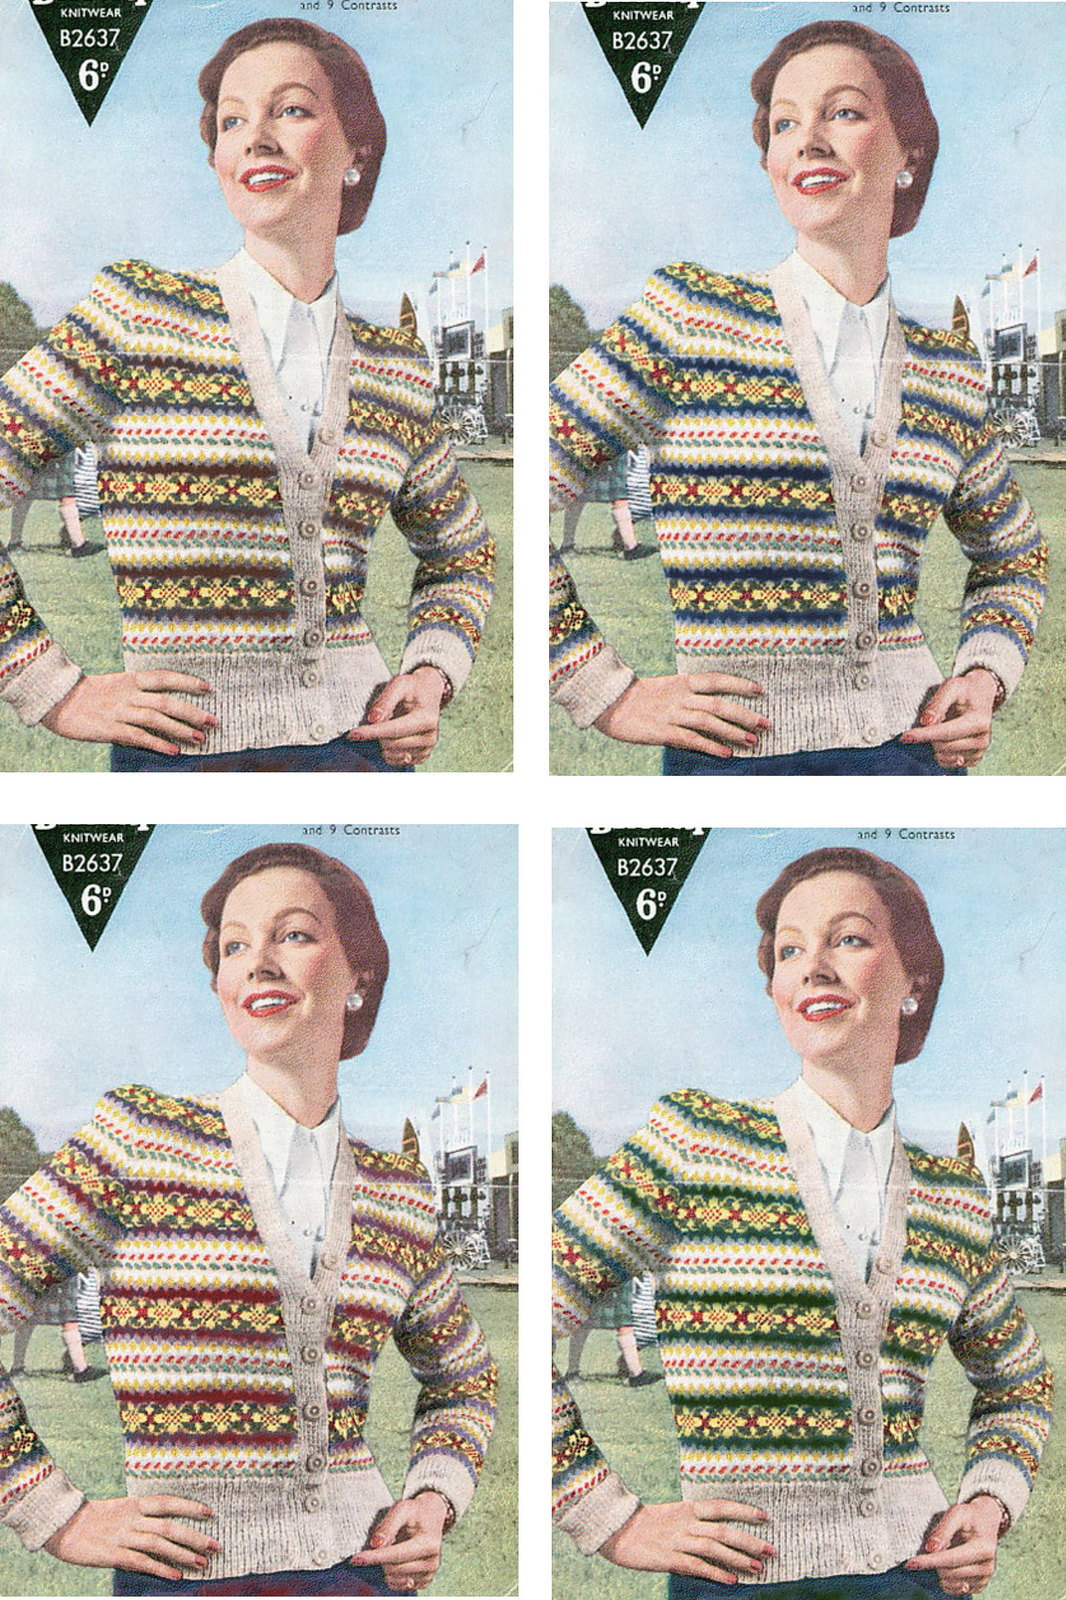
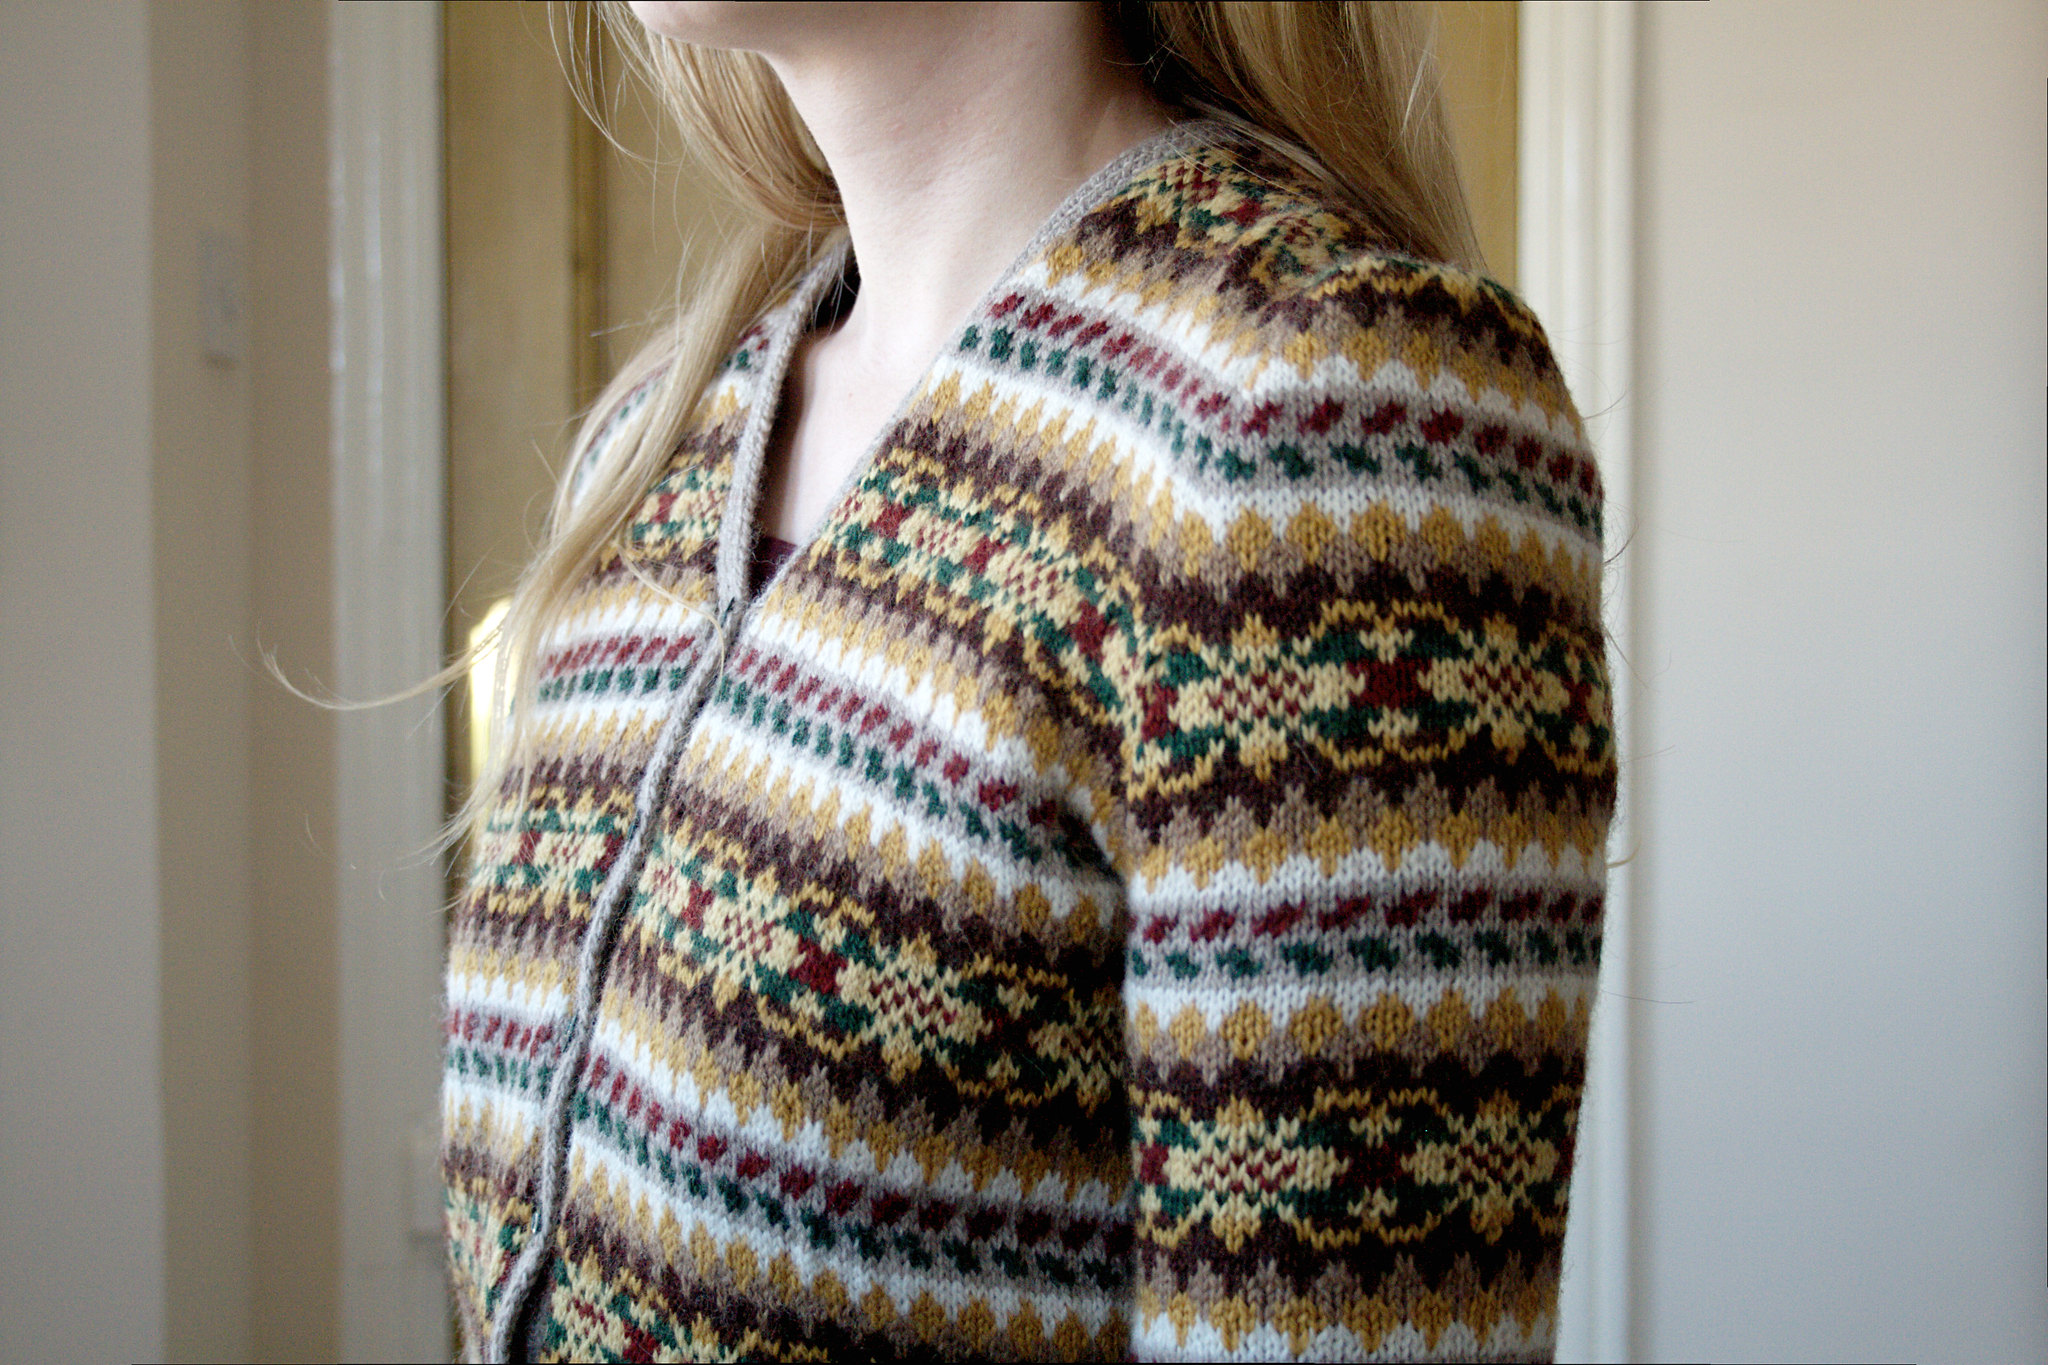
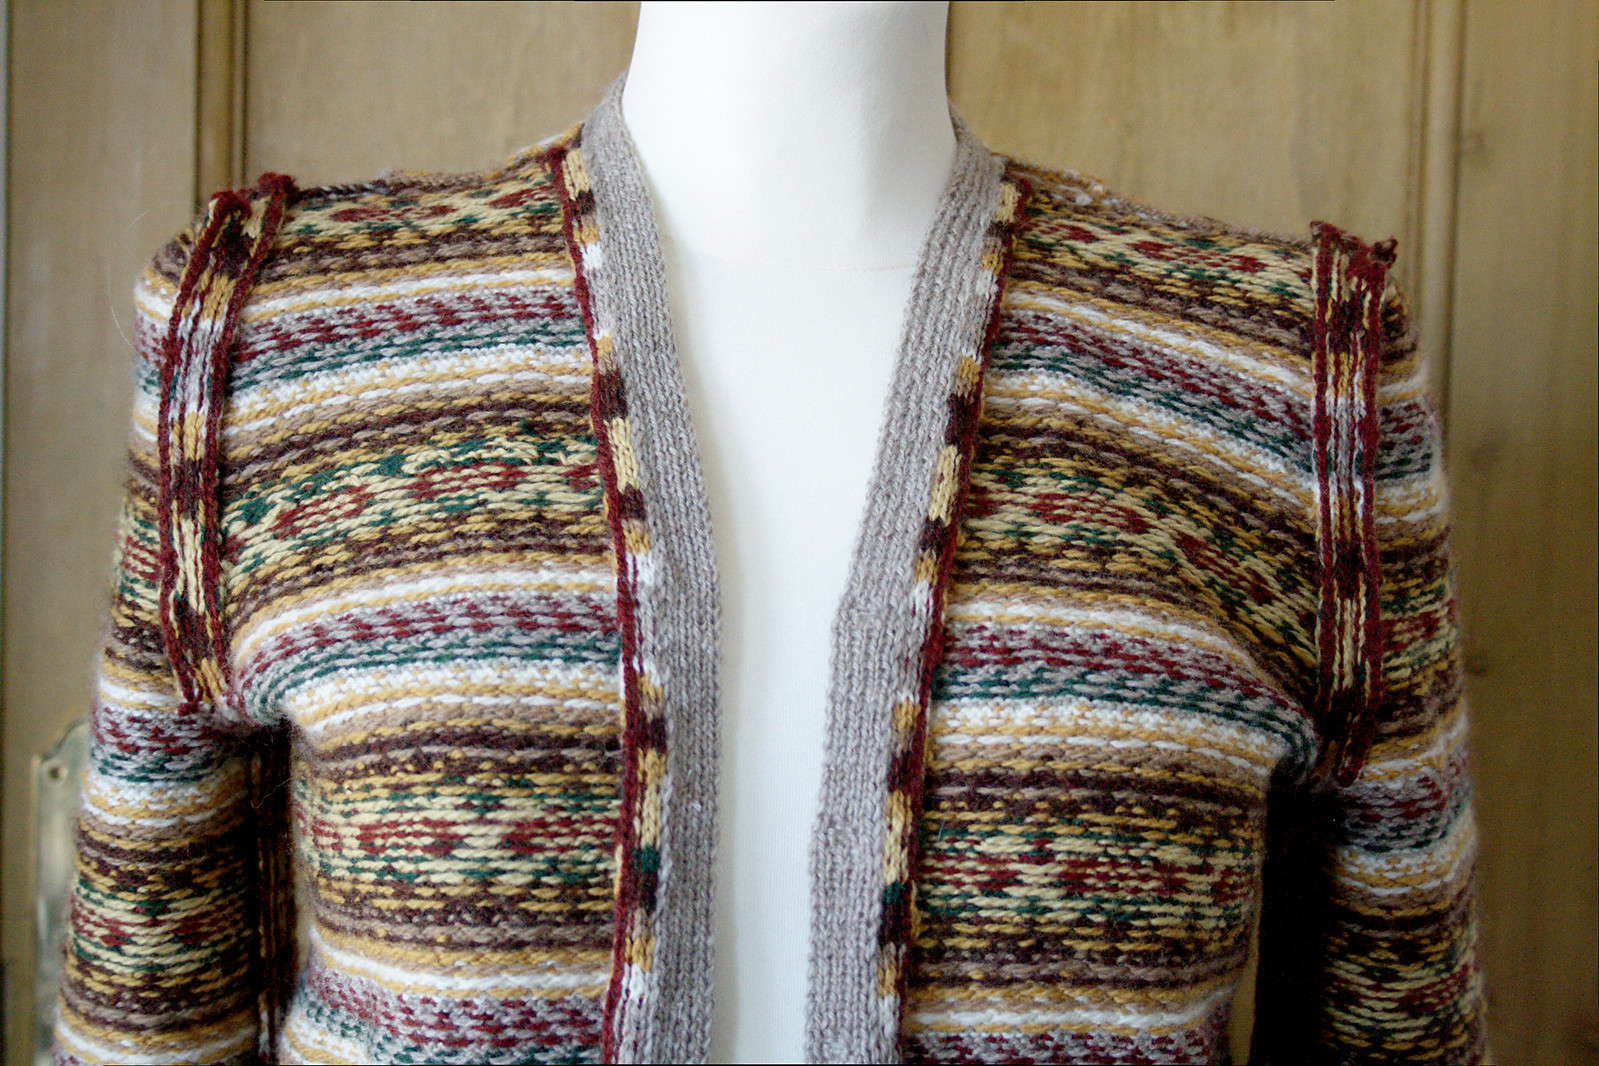
Then came the color picking process. I never really liked the original colors but I figured that changing just the "main" color (the blue) might change the entire look of the pattern. So I did a bit of photoshopping to see what would happen and discovered that I was right. I think I could have actually picked any of the colors and ended up with a lovely palette but I decided to go with brown. So I replaced the bright blue with dark brown and the light blue with light brown. I kept all the other colors the same. When I made the first swatch however, I found that the 'true red' and 'true green' didn't fit in with the rest of the dark earthy-toned palette so I made a second swatch, replacing them with the dark red and dark green.
The body
I cast on for the body flat rather than in the round, because when I knitted my previous steeked cardigan I noticed that the steek adds a lot of bulk at the ribbing and also has a tendency to peek out at the hem. So I knitted the ribbing flat, then joined in the round when I started the fair isle pattern. The body has a 9 stitch steek at the center front and for each armhole. The fact that this cardigan has a V neck makes knitting in the round a lot easier because you don't have to cast on a steek for the neckline or switch to knitting flat. Only when I got to the shoulder shaping I had to switch to knitting flat, but this is only for a few rows.

My gauge changed a little when I was knitting the body and at first I was afraid that it would end up being too big. The size I aimed for was 33"(my bust is 32") but the final size is 34" which is something I can definitely live with.
The sleeves
Trough two previously knitted versions of this cardigan on Ravelry I discovered "Siamese sleeves" and decided that I was going to knit the sleeves that way too. Rather than knitting each sleeve separately - whether it be flat or in the round - where you end up with a lot of ends to weave in, you knit the two sleeves together as one big tube with steeks to seperate them. When you're finished knitting you just cut the steeks which also cuts all the ends off. Then you just seam them as if they where knitted flat. It does create slightly bulky seams, but it makes the knitting so much easier and faster and it uses less yarn.
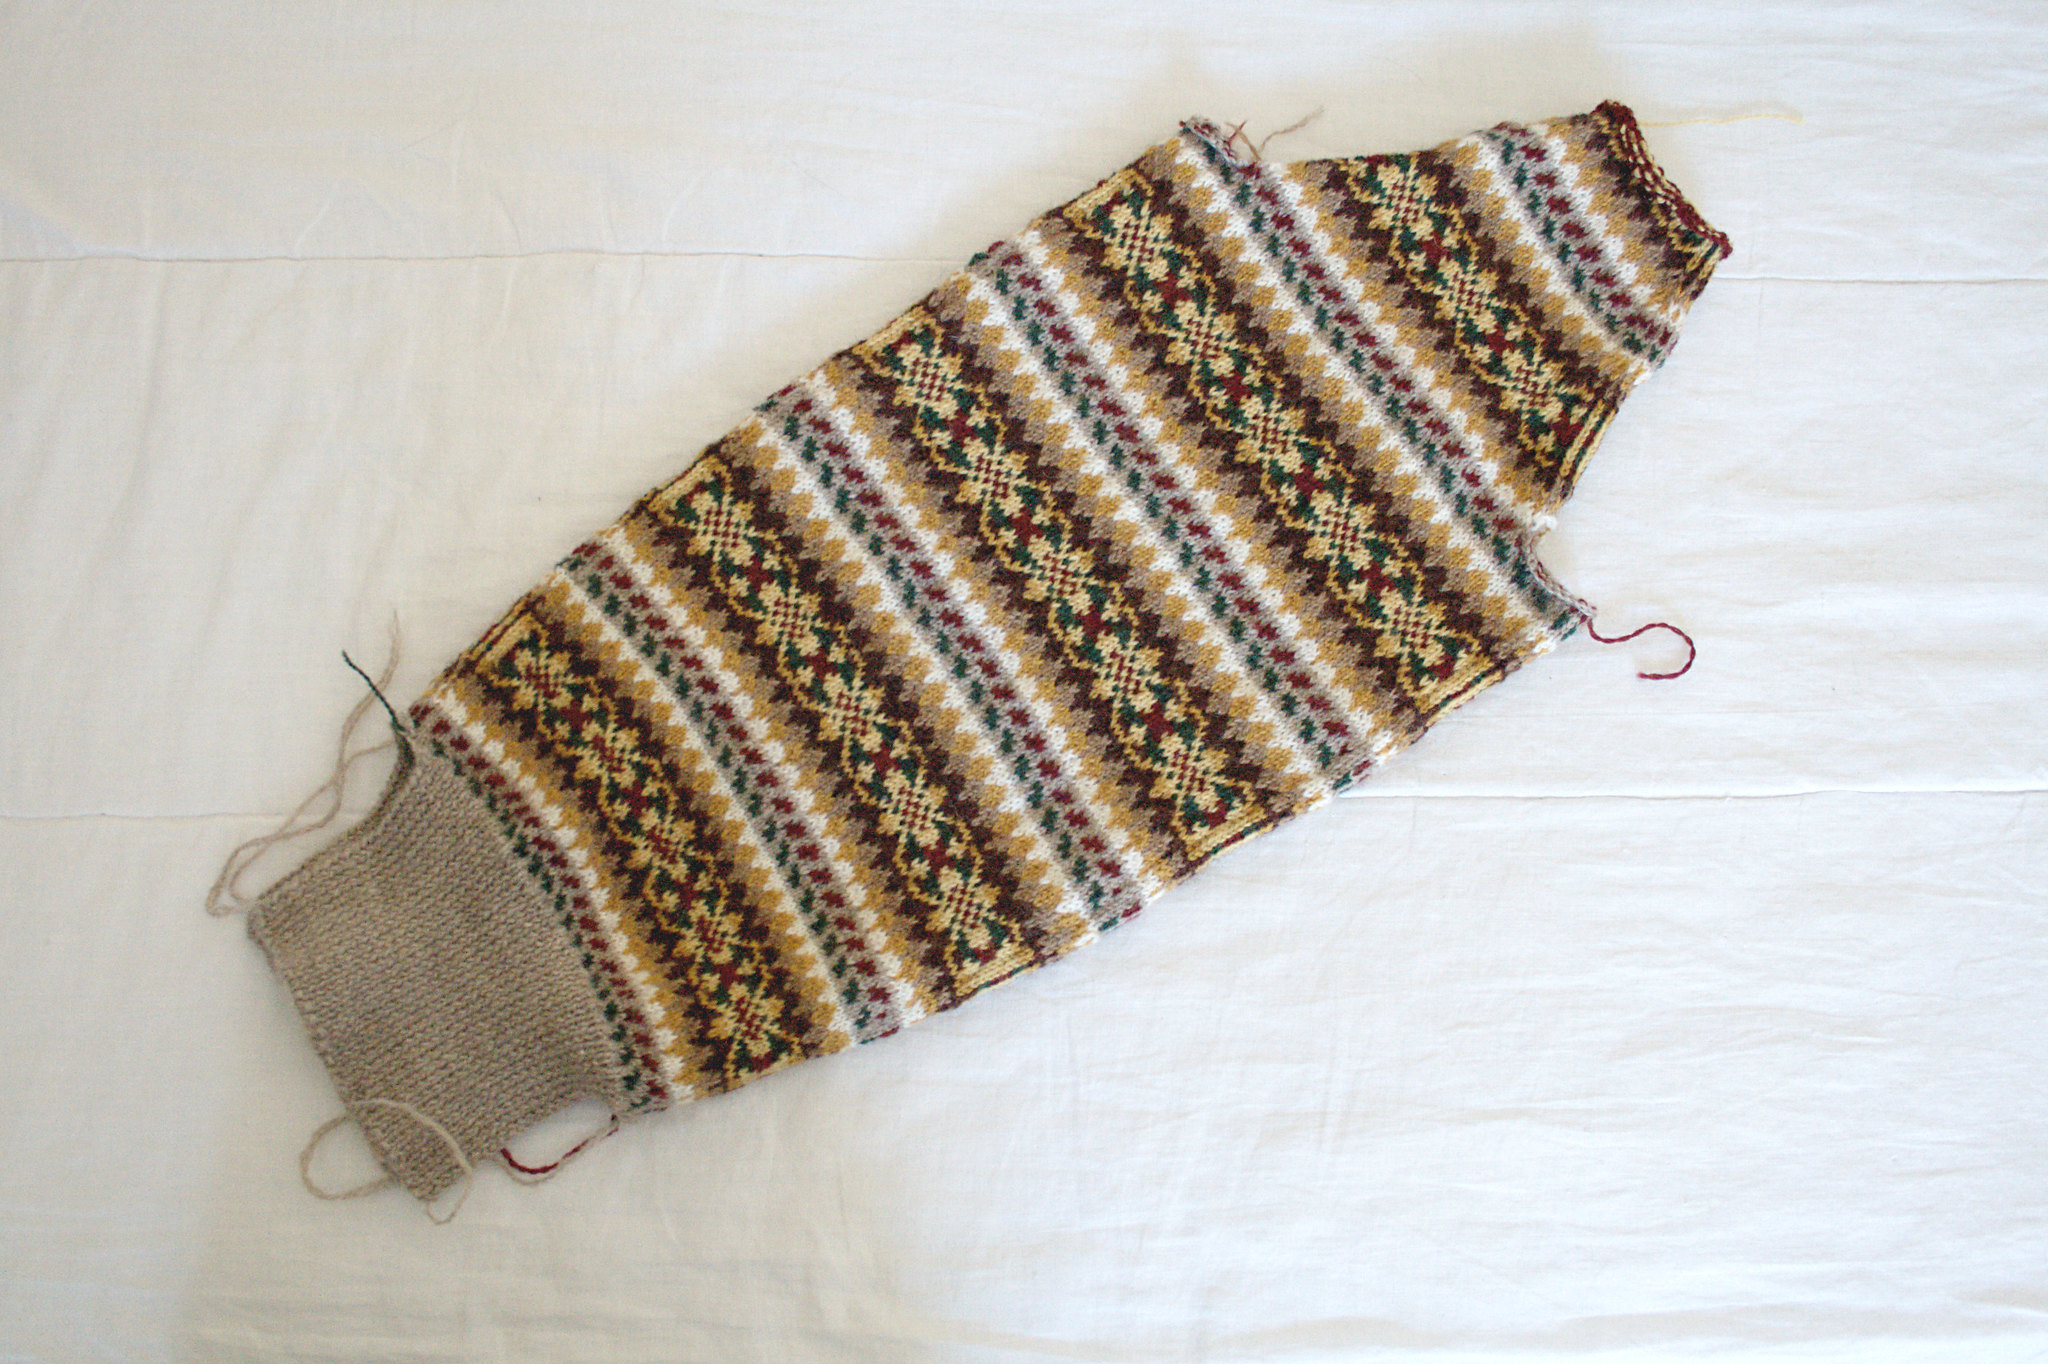

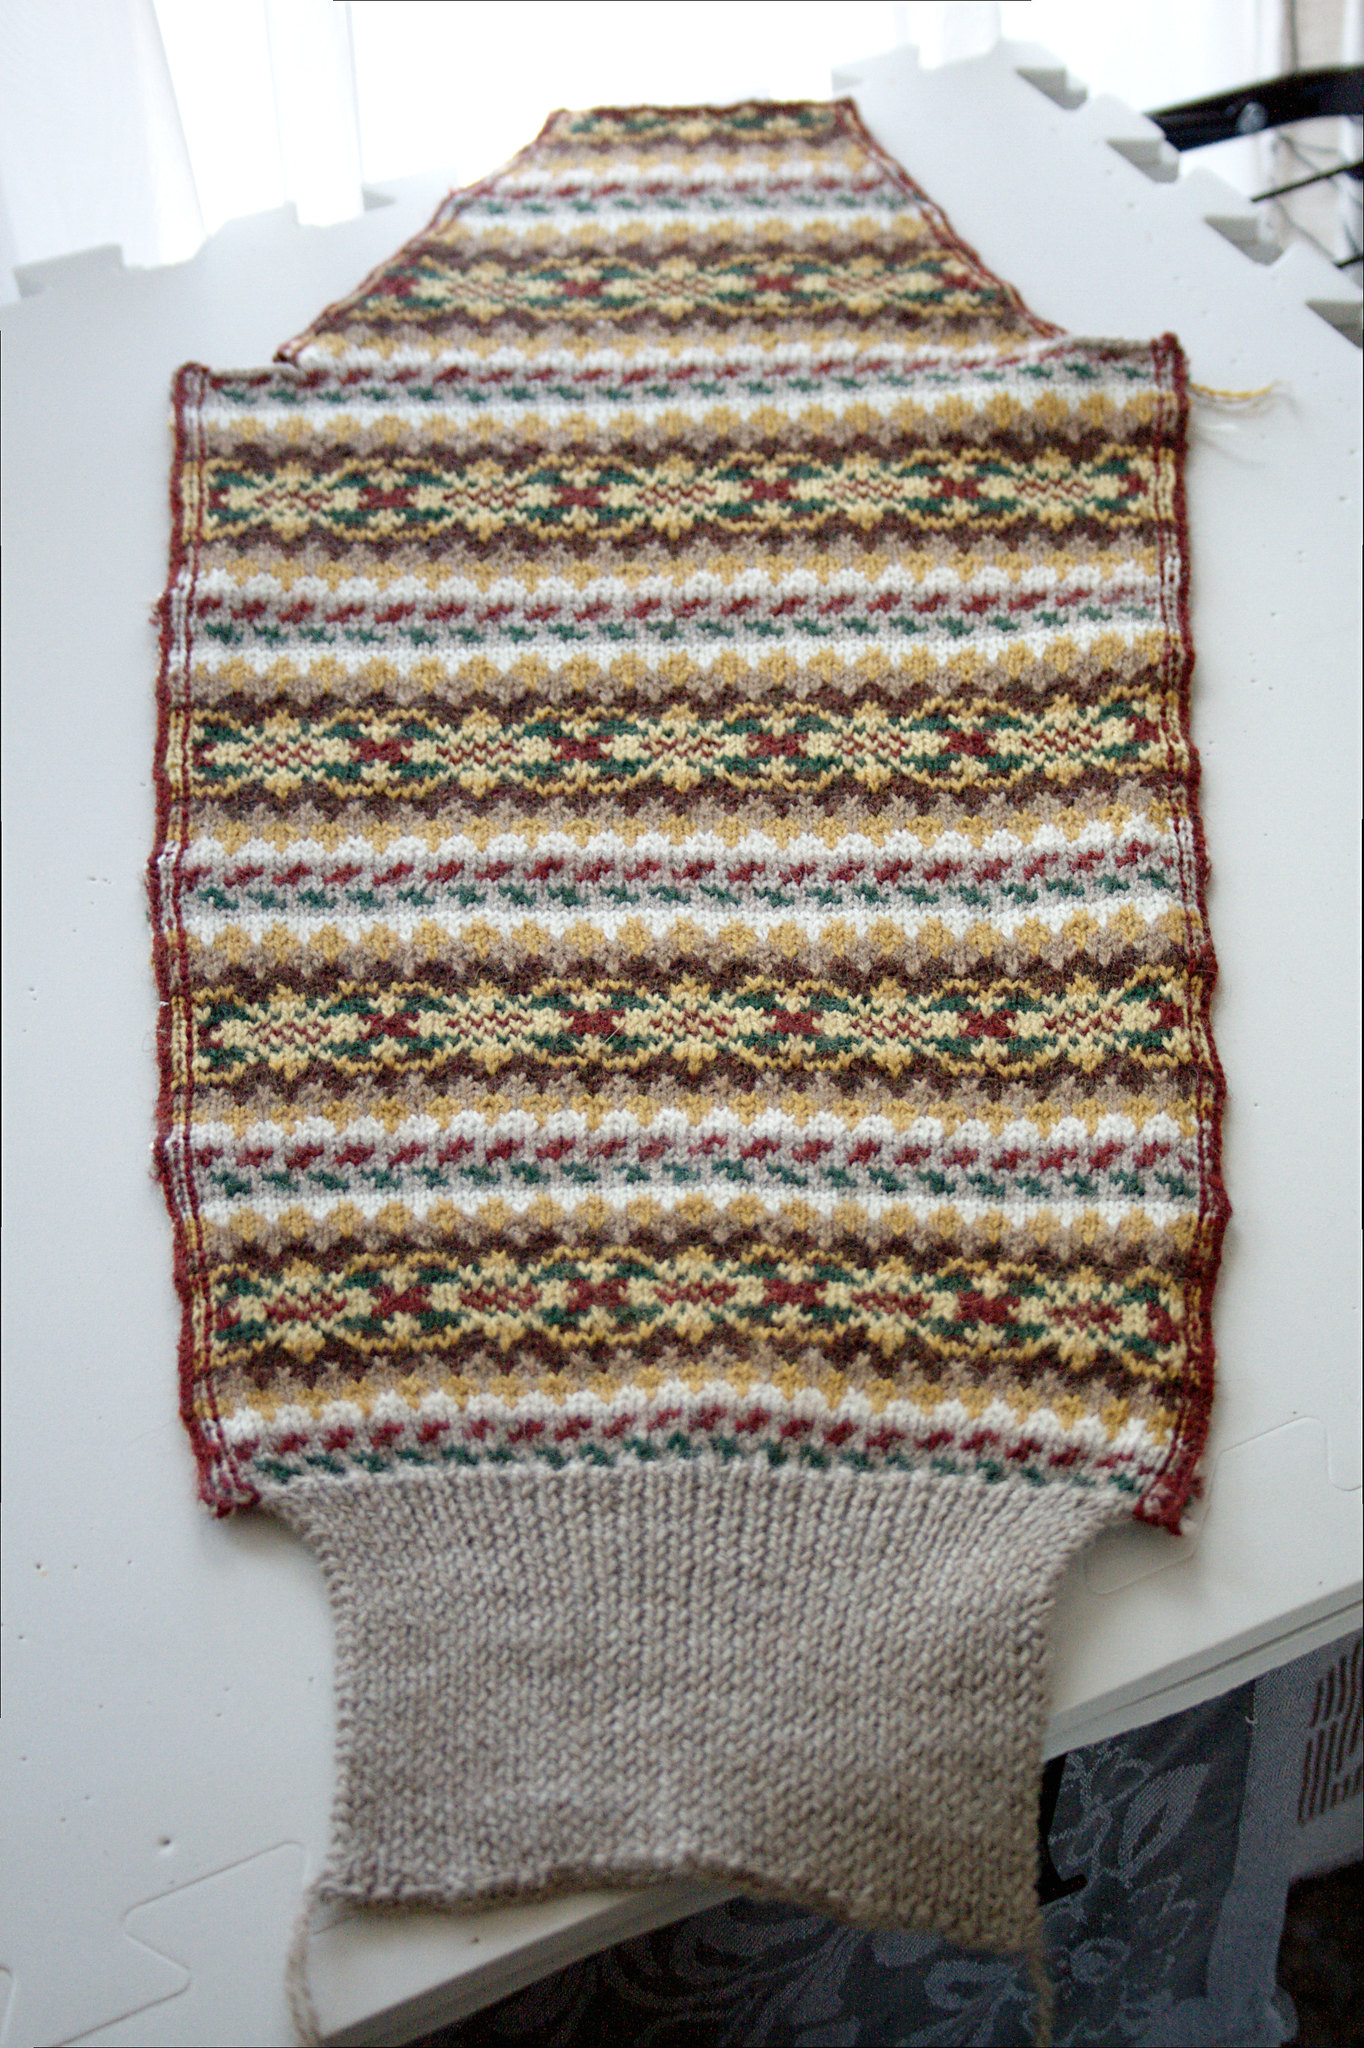
I did knit each of the cuffs flat first, then cast on extra stitches for the steeks, joined them together and started knitting in the round. I realized though, that next time I am knitting sleeves like this, I will start them at the fair isle pattern, in the round with a provisional cast on, then when they are cut and seamed together, knit the cuffs down in the round. This takes away the annoying seam at the cuff and also makes it easier to get the perfect sleeve length.

Getting the length for the sleeves right while still making sure that the pattern would line up was something I really struggled with. Originally, the pattern increases to the full number of sleeve stitches directly after the cuff, but you knit the first repeat of the fair isle pattern on smaller needles to compensate. But this made the sleeves way to big for me and I almost got a bishop sleeve effect. I calculated that with my gauge I could easily take one pattern repeat off and still have the right size at the upper arm. So I ripped back to the cuff, increased to one pattern repeat less that the original, then knitted the first repeat on 2.75mm, the second on 3.25mm and the third on 3.75 (which is the size I used for the body). Unfortunately I noticed that the sleeve did seem a bit tight at the upper arm after all, so I went up another needle size and knitted the rest of the sleeve on 4mm. Definitely not something I would recommend doing, because this makes it a lot more difficult to get the sleeve head to match the armhole. In retrospect I should have just increased stitches rather than needle size, but hey, you live and learn, right? The fact that the fair isle pattern on the sleeves did end up matching the body's while also having the right length was just pure luck.
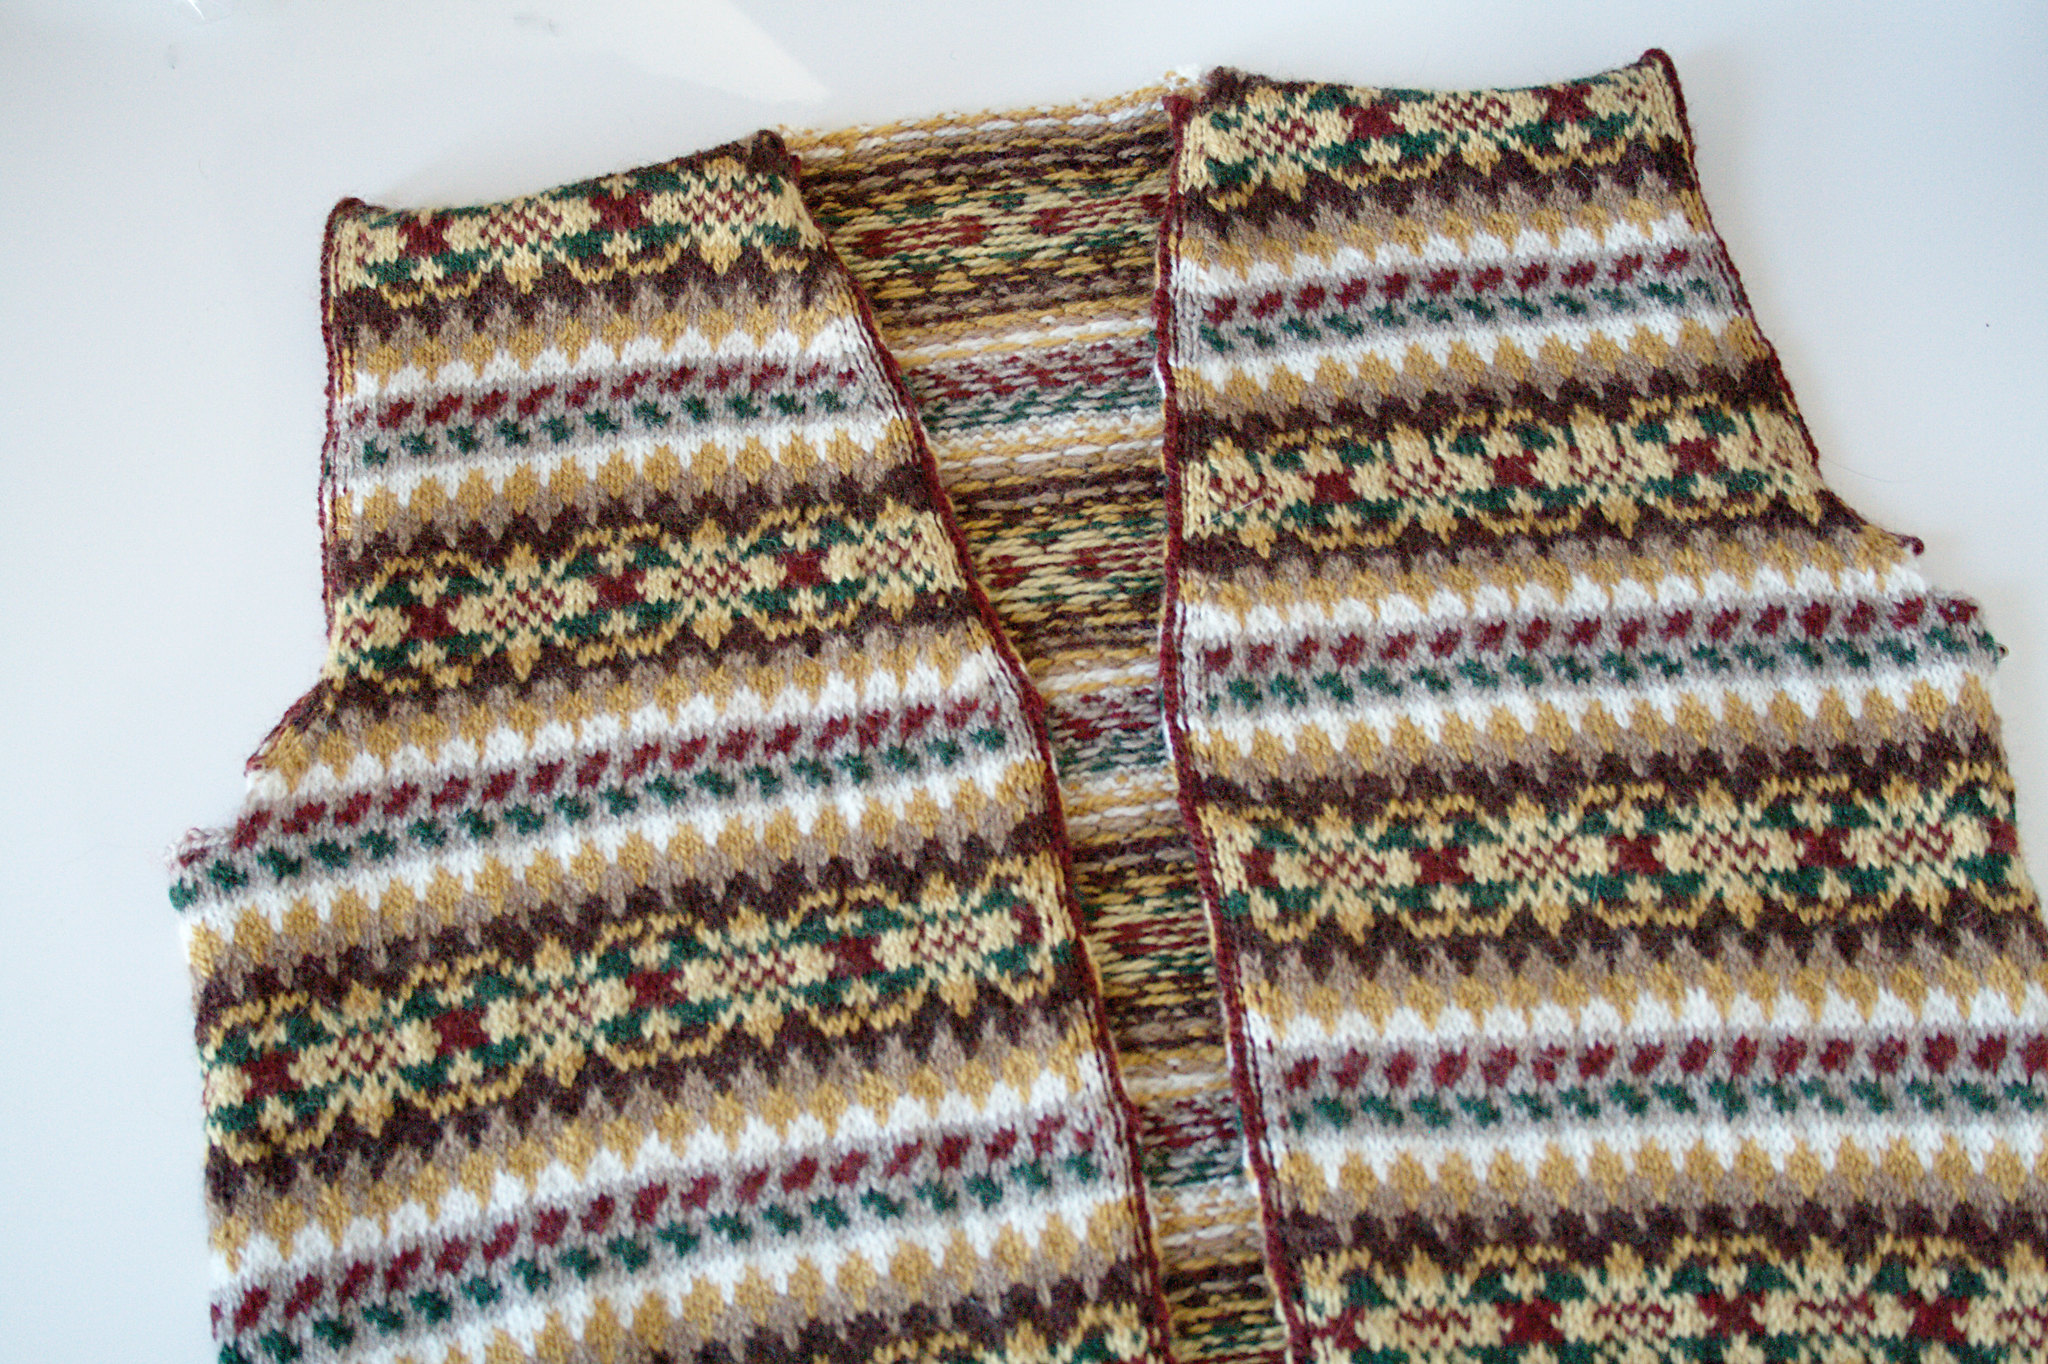
The steeks
The center front, armhole and sleeve seam steeks where all 9 sts wide. The sleeve head steeks where only 7 sts wide because I was running out of yarn and hoped to save some yarn this way (it didn't - I ended up having to order more). I made the steeks 9 stitches wide to ensure I would have enough room to switch colors, while still being able to cut those stitches where I joined the new color off when I cut the steek open (to make sure that all the loose ends would be cut off as well).
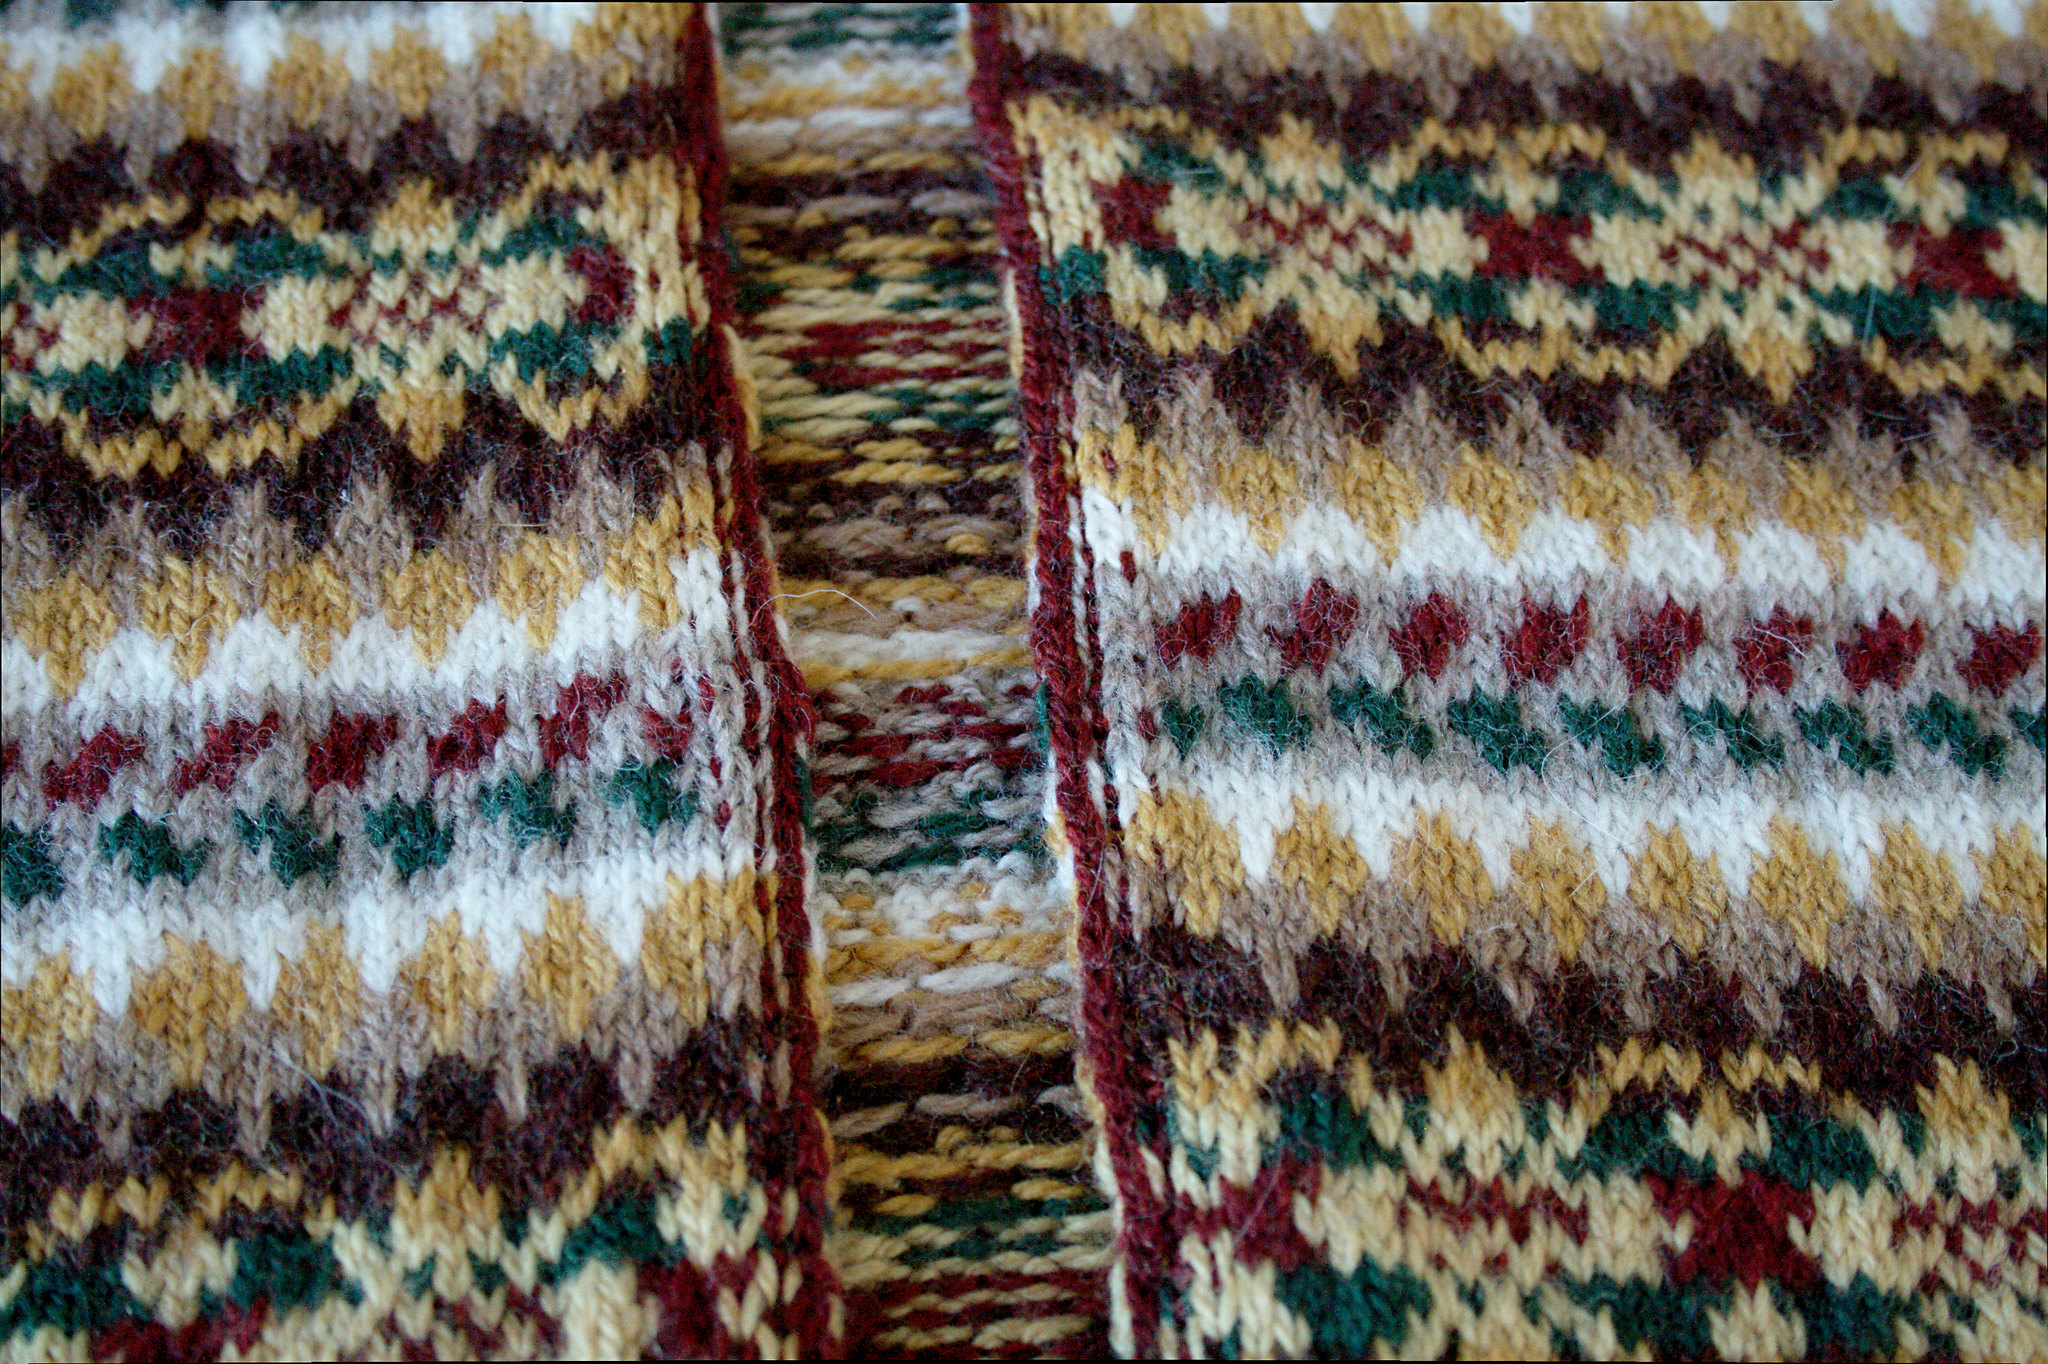
Because I wanted the sleeve seams and sleeve cap seams to have the least amount of bulk, I wanted to cut the steeks off as short as I possibly could. So I did some extra reinforcing before cutting: First, I crocheted along the stitch where I was going to cut, then I did a backstitch in the stitch next to it and then I also did a running stitch in the stitch next to that one. Then I cut all the steeks to 2.5 stitches wide.

Finishing
All the pieces where seamed together with mattress stitch, as I always do with seamed garments. I ended up having a little bit of extra fabric left over at the top of the sleeve heads so I gathered them in slightly by skipping stitches while seaming. The button band is knitted separately and then sewn to the opening and the neckline. I was sewing on the button band as I was knitting it to make sure the buttonholes ended up in the right place and to make sure the button band was exactly the right length.
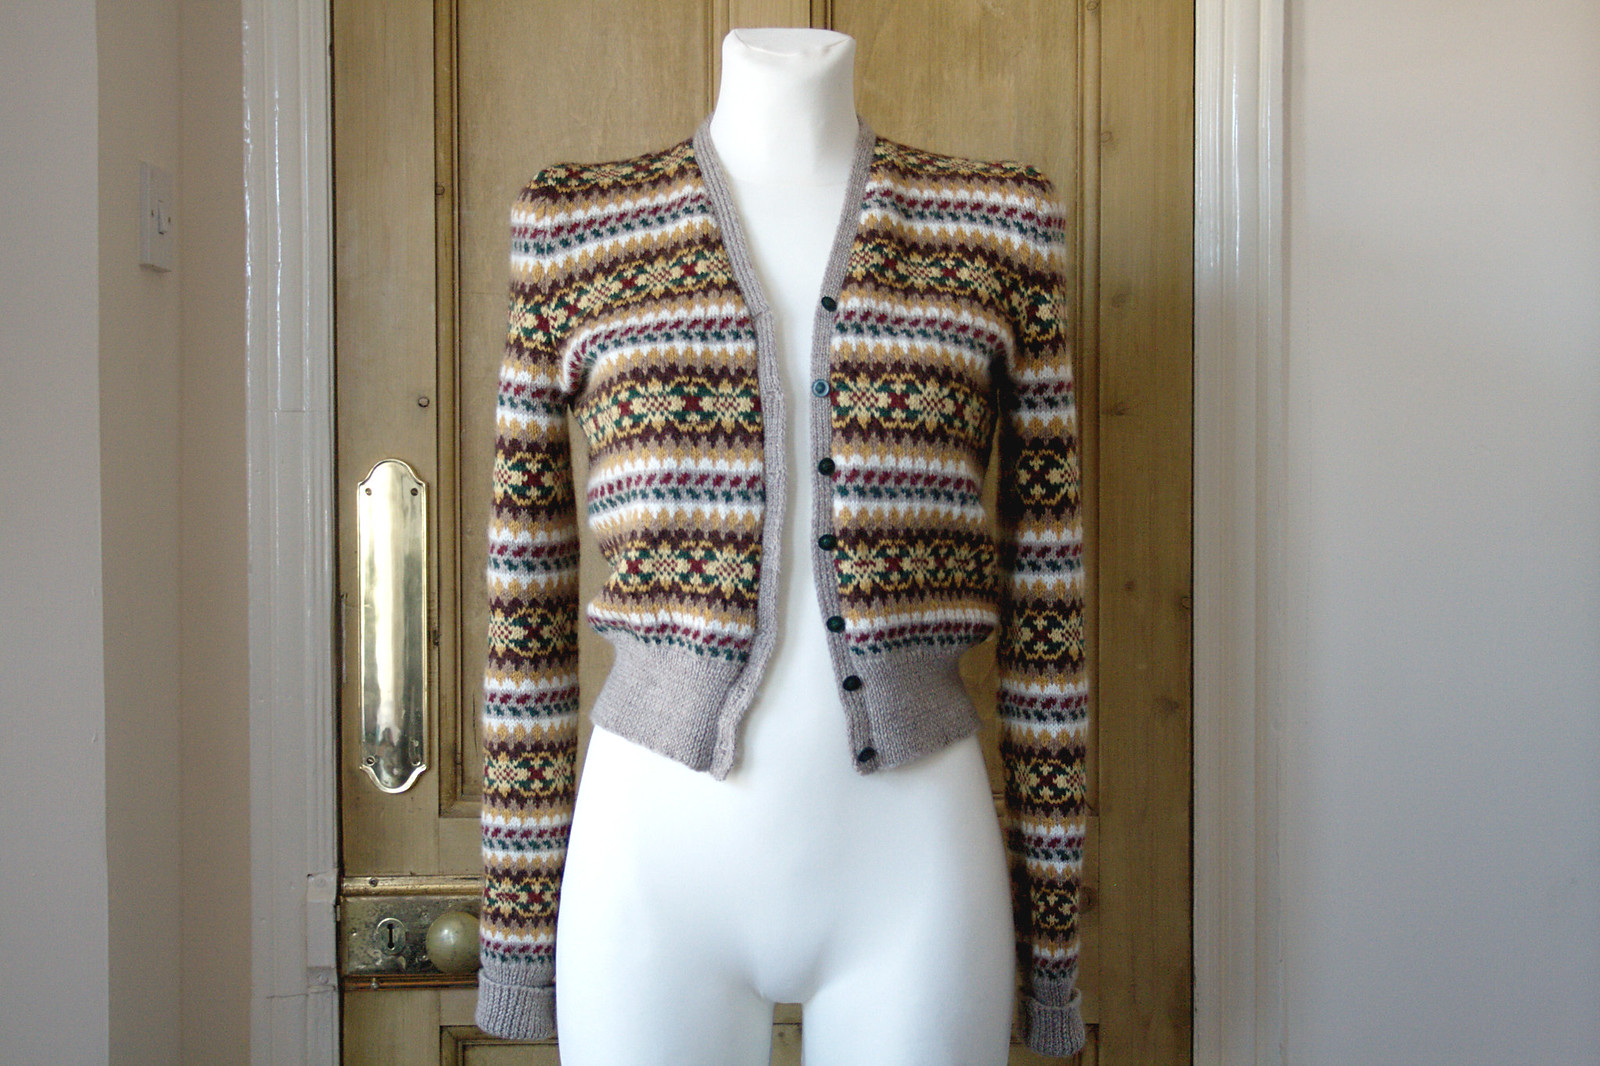
Pattern: Bestway B2637
Yarn: Knit Picks Palette in Cream, Cornmeal, Garnet Heather, Hare Heather, Ivy, Merlot Heather, Turmeric, Wheat Heather
Started: May 16
Finished: August 15
Buttons: Vintage plastic, Ebay


This is a really beautiful cardigan! You've done a great job, and I love the subtle color palette
ReplyDeleteOh my goodness this is amazing! Bestway B2637 is my dream pattern and it's so lovely to see it made up. Your colour palette really changed the mood of the cardi.
ReplyDeleteJust lovely :) Well done!
ReplyDeleteYour cardigan is simply gorgeous. You have inspired me to give it a try. Thank you for sharing your thought process in attempting to get the right fit, that is a big help for me. Your color selection is simply stunning!
ReplyDeleteMarie
Your cardigan is simply gorgeous. You have inspired me to give it a try. Thank you for sharing your thought process in attempting to get the right fit, that is a big help for me. Your color selection is simply stunning!
ReplyDeleteMarie
Oh my! This is cardigan perfection!
ReplyDeleteBeautiful cardigan. Thank you for sharing all your techniques. Most interesting and useful. Your fairisle knitting is immaculate and even. Something that is difficult to achieve (as I know). A credit to you. Keep knitting!
ReplyDelete